在pcduino上对比haproxy和nginx的负载效果
安装haproxy
下载地址
http://www.haproxy.org/download/1.4/src/haproxy-1.4.24.tar.gz
安装如下
make TARGET=linux26 ARCH=arm PREFIX=/program/haproxy
make install PREFIX=/program/haproxy
配置如下:
global
        log 192.168.1.132   local0
        #log 127.0.0.1  local1 notice
        #log loghost    local0 info
        maxconn 4096
        chroot /program/haproxy
        uid 0                          #所属运行的用户uid
        gid 0                         #所属运行的用户组
        daemon
        nbproc 1
        pidfile /program/haproxy/run/haproxy.pid
        #debug
        #quiet

defaults
        log     global
        log     192.168.1.132       local3        #日志文件的输出定向
        mode    http                            #所处理的类别
        option  httplog                        #日志类别
        option  httpclose
        option  dontlognull
        option  forwardfor
        option  redispatch
        retries 2                      #设置多个haproxy并发进程提高性能
        maxconn 2000
        balance roundrobin                     #负载均衡算法
        stats   uri     /haproxy-stats        #haproxy 监控页面的访问地址
        # 可通过 http://localhost:1080/haproxy-stats 访问
        contimeout      5000
        clitimeout      50000
        srvtimeout      50000

listen  localhost 0.0.0.0:1080                   #运行的端口及主机名
        mode    http
        option  httpchk GET /           #健康检测地址
        server  s1 192.168.1.132:9900 weight 3 check
        server  s2 192.168.1.80:8880 weight 3 check
简单操作如下:
启动服务:
# /program/haproxy/sbin/haproxy -f /program/haproxy/haproxy.cfg
重启服务:
# /program/haproxy/sbin/haproxy -f /program/haproxy/haproxy.cfg -st `cat /program/haproxy/logs/haproxy.pid` (没有换行)
停止服务:
# killall haproxy
#./haproxy -h 说明

       -v     屏蔽版本

       -vv    编译选项

       -V     版本

       -d     前台,debug模式

       -db    屏蔽后台模式

       -D     daemon模式启动

       -q     安静模式,不输出信息

       -c     对配置文件进行语法检查

       -s     显示统计数据

       -l     显示详细统计数据

       -ds    不使用speculative epoll

       -de    不使用epoll

       -dp    不使用poll

       -sf
       程序启动后向pidlist里的进程发送FINISH信号,这个参数放在命令行的最后

       -st
       程序启动后向pidlist里的进程发送TERMINATE信号,这个参数放在命令行的最后
安装nginx
下载地址
http://nginx.org/download/nginx-1.5.6.tar.gz
首先安装pcre。
ftp://ftp.csx.cam.ac.uk/pub/software/programming/pcre/pcre-8.33.tar.gz
然后是configure、make、make install。
最后做个软连接。
ln -s /usr/local/lib/libpcre.so.1 /usr/lib/
开始安装nginx编译参数如下
./configure –prefix=/program/nginx –user=root –group=root –with-pcre –with-select_module –with-poll_module –with-http_stub_status_module –with-http_ssl_module –with-http_realip_module –with-http_gzip_static_module
配置如下
user  root root;
worker_processes 1;
pid        logs/nginx.pid;
events {
    use epoll;
    worker_connections  5120;
}

http {
    include       mime.types;
    default_type  application/octet-stream;
    server_tokens off;
    log_format  main  '$remote_addr - $remote_user [$time_local] "$request" '
                      '$status $body_bytes_sent "$http_referer" '
                      '"$http_user_agent" "$http_x_forwarded_for" "$request_time" '
                      '"$upstream_cache_status"';
    access_log  logs/access.log  main ;
    sendfile        on;
    keepalive_timeout  120;
    tcp_nodelay on;
    tcp_nopush on;
    client_header_buffer_size 128k;
    large_client_header_buffers 4 64k;
    reset_timedout_connection on;
    proxy_ignore_client_abort on;
   ######################################
   upstream  deploy_tool {
            server 192.168.1.132:9900;
       }
   server {
        listen       80;
        server_name 192.168.1.132;
        location / {
        proxy_pass_header      Server;
        proxy_redirect          off;
        proxy_set_header        X-Real-IP $remote_addr;
        proxy_set_header        X-Forwarded-For $proxy_add_x_forwarded_for;
        proxy_set_header        Host $http_host;
        client_max_body_size   150m;
        proxy_connect_timeout  2000;
        proxy_send_timeout     2000;
        proxy_read_timeout     300;
        access_log off;
        proxy_pass              http://deploy_tool;
        }
        location /status {
             stub_status on;
             access_log  off;
             auth_basic_user_file    /lnmp/nginx/conf/htpasswd;
        }
     }
}
WEB项目使用我的部署工具,只是连接到首页。python使用2.7。压力工具就是写了用urllib2多线程获取页面的代码,并发150个。测试结果如下:
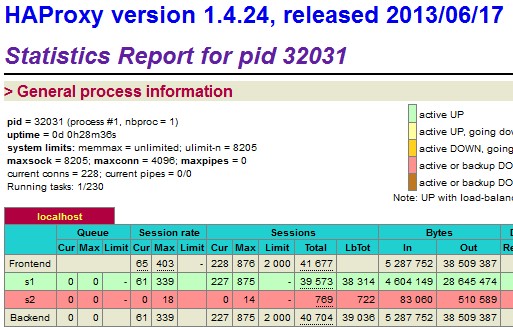
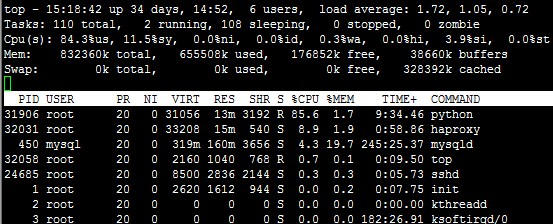
haproxy:


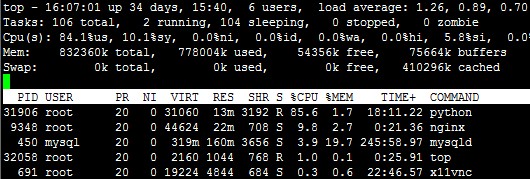
nginx:


结论:
如果只是简单反向连接,两者效率差不多。haproxy后端检测效果不错,对长连接的处理也很好,可做mysql等其他服务器的负载工作。nginx有更强大的模块,如缓存、uwsgi等功能一起用,nginx就方便了很多。以后WEB的服务使用nginx,其它需要负载的使用haproxy。