11月 19

pcduino对比测试nginx和haproxy的负载效果

  在pcduino上对比haproxy和nginx的负载效果

  安装haproxy
  下载地址
http://www.haproxy.org/download/1.4/src/haproxy-1.4.24.tar.gz

  安装如下
make TARGET=linux26 ARCH=arm PREFIX=/program/haproxy
make install PREFIX=/program/haproxy

配置如下:

global
        log 192.168.1.132   local0
        #log 127.0.0.1  local1 notice
        #log loghost    local0 info
        maxconn 4096
        chroot /program/haproxy
        uid 0                          #所属运行的用户uid
        gid 0                         #所属运行的用户组
        daemon
        nbproc 1
        pidfile /program/haproxy/run/haproxy.pid
        #debug
        #quiet

defaults
        log     global
        log     192.168.1.132       local3        #日志文件的输出定向
        mode    http                            #所处理的类别
        option  httplog                        #日志类别
        option  httpclose
        option  dontlognull
        option  forwardfor
        option  redispatch
        retries 2                      #设置多个haproxy并发进程提高性能
        maxconn 2000
        balance roundrobin                     #负载均衡算法
        stats   uri     /haproxy-stats        #haproxy 监控页面的访问地址
        # 可通过 http://localhost:1080/haproxy-stats 访问
        contimeout      5000
        clitimeout      50000
        srvtimeout      50000

listen  localhost 0.0.0.0:1080                   #运行的端口及主机名
        mode    http
        option  httpchk GET /           #健康检测地址
        server  s1 192.168.1.132:9900 weight 3 check
        server  s2 192.168.1.80:8880 weight 3 check

简单操作如下:
启动服务:
# /program/haproxy/sbin/haproxy -f /program/haproxy/haproxy.cfg

重启服务:
# /program/haproxy/sbin/haproxy -f /program/haproxy/haproxy.cfg -st `cat /program/haproxy/logs/haproxy.pid` (没有换行)

停止服务:
# killall haproxy

#./haproxy -h 说明
-v 屏蔽版本
-vv 编译选项
-V 版本
-d 前台,debug模式
-db 屏蔽后台模式
-D daemon模式启动
-q 安静模式,不输出信息
-c 对配置文件进行语法检查
-s 显示统计数据
-l 显示详细统计数据
-ds 不使用speculative epoll
-de 不使用epoll
-dp 不使用poll
-sf 程序启动后向pidlist里的进程发送FINISH信号,这个参数放在命令行的最后
-st 程序启动后向pidlist里的进程发送TERMINATE信号,这个参数放在命令行的最后

  安装nginx
  下载地址
http://nginx.org/download/nginx-1.5.6.tar.gz
  首先安装pcre。
ftp://ftp.csx.cam.ac.uk/pub/software/programming/pcre/pcre-8.33.tar.gz
然后是configure、make、make install。
最后做个软连接。
ln -s /usr/local/lib/libpcre.so.1 /usr/lib/

  开始安装nginx编译参数如下
./configure –prefix=/program/nginx –user=root –group=root –with-pcre –with-select_module –with-poll_module –with-http_stub_status_module –with-http_ssl_module –with-http_realip_module –with-http_gzip_static_module
配置如下

user  root root;
worker_processes 1;
pid        logs/nginx.pid;
events {
    use epoll;
    worker_connections  5120;
}

http {
    include       mime.types;
    default_type  application/octet-stream;
    server_tokens off;
    log_format  main  '$remote_addr - $remote_user [$time_local] "$request" '
                      '$status $body_bytes_sent "$http_referer" '
                      '"$http_user_agent" "$http_x_forwarded_for" "$request_time" '
                      '"$upstream_cache_status"';
    access_log  logs/access.log  main ;
    sendfile        on;
    keepalive_timeout  120;
    tcp_nodelay on;
    tcp_nopush on;
    client_header_buffer_size 128k;
    large_client_header_buffers 4 64k;
    reset_timedout_connection on;
    proxy_ignore_client_abort on;
   ######################################
   upstream  deploy_tool {
            server 192.168.1.132:9900;
       }
   server {
        listen       80;
        server_name 192.168.1.132;
        location / {
        proxy_pass_header      Server;
        proxy_redirect          off;
        proxy_set_header        X-Real-IP $remote_addr;
        proxy_set_header        X-Forwarded-For $proxy_add_x_forwarded_for;
        proxy_set_header        Host $http_host;
        client_max_body_size   150m;
        proxy_connect_timeout  2000;
        proxy_send_timeout     2000;
        proxy_read_timeout     300;
        access_log off;
        proxy_pass              http://deploy_tool;
        }
        location /status {
             stub_status on;
             access_log  off;
             auth_basic_user_file    /lnmp/nginx/conf/htpasswd;
        }
     }
}

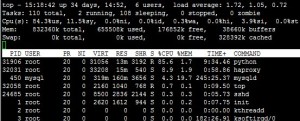
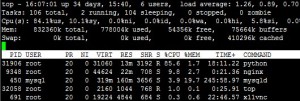
  WEB项目使用我的部署工具,只是连接到首页。python使用2.7。压力工具就是写了用urllib2多线程获取页面的代码,并发150个。测试结果如下:
haproxy:
haproxystatus
ubuntu
nginx:
nginxstatus
ubuntu-nginx

结论:
  如果只是简单反向连接,两者效率差不多。haproxy后端检测效果不错,对长连接的处理也很好,可做mysql等其他服务器的负载工作。nginx有更强大的模块,如缓存、uwsgi等功能一起用,nginx就方便了很多。以后WEB的服务使用nginx,其它需要负载的使用haproxy。

10月 16

用Nginx为uwsgi后端图片服务器做缓存服务

  很早处理的问题,现在拿出来做个记录。
  需求:后端图片服务处理各种格式、尺寸的图片。使用python处理,系统为Django+uwsgi(其实直接用tornado更好,也更方便)。前端需要做缓存,直接使用nginx。当前问题nginx和uwsgi连接后就不能使用cache服务了,nginx的proxy cache服务是在upstream的流转发过程中实现。所以要做个内部转发。nginx部分配置如下:

日志部分,添加缓存记录方将来统计击中率,参数为upstream_cache_status。
日志的中表示说明
MISS 未命中,请求被传送到后端
HIT 缓存命中
EXPIRED 缓存已经过期请求被传送到后端
UPDATING 正在更新缓存,将使用旧的应答
STALE 后端将得到过期的应答

log_format main ‘$remote_addr – $remote_user [$time_local] “$request” ‘
‘$status $body_bytes_sent “$http_referer” ‘
‘”$http_user_agent” “$http_x_forwarded_for” “$request_time” ‘
‘”$upstream_cache_status”‘;

转发的主要部分

upstream  local_img {
   server localhost:81;
   }
server{
       listen       81;
       server_name 127.0.0.1;
       location / {
                uwsgi_pass   127.0.0.1:9000;
                client_max_body_size   10m;
                include       uwsgi_params;
                access_log  off;
                autoindex off;
                }
    }

server {
       listen       80;
       server_name imgtest.simonzhang.net ;
       location / {
                #proxy cache stat
                proxy_redirect          off;
                proxy_set_header        Host            $host;
                proxy_set_header        X-Real-IP       $remote_addr;
                proxy_set_header        X-Forwarded-For $proxy_add_x_forwarded_for;
                proxy_connect_timeout   15;
                proxy_send_timeout      45;
                proxy_read_timeout      45;
                proxy_buffer_size       128k;
                proxy_buffers           4 128k;
                proxy_busy_buffers_size 128k;
                proxy_temp_file_write_size 128k;
                proxy_cache cache_one;
                # 成功浏览过的图片5天过期
                proxy_cache_valid 200 5d;
                proxy_cache_valid 404 304 1m;
                proxy_cache_key $host$uri$is_args$args;
                #add_header X-Cache $upstream_cache_status;
                proxy_pass http://local_img;
                #proxy cache end
                }
    }

  重启nginx服务后查看日志,日志中已经有了HIT的日志,日志显示使用处理耗时0.000ms。收工。

2月 21

服务器 自动封锁和解封IP 对付攻击

  服务器流量暴涨,首先通过访问日志查看。每个IP并发不是很高,分布也很广,但是都是只访问主页,可见不是抓取服务导致。通过“netstat -nat|awk ‘{print awk $NF}’|sort|uniq -c|sort -n”t命令查看,连接中还有很多SYN_RECV、TIME_WAIT、ESTABLISHED。看来是小型的攻击。首先是修改web服务的配置,缩减了timeout时间,在nginx上禁止一部分并发比较高的IP,小改系统参数。流量降了20M,但还是太高。nginx虽然禁止了IP,如果用浏览看是一个空白页面,但是每个连接还会产生很小的流量。最后决定将最小的返回值也封掉,直接在iptables上drop掉连接。每个超限IP暂定封2天。写个脚本自动运行。

  此脚本在在centos5.3+python2.6.6使用通过。需要注意,此脚本统计日志完毕会将nginx日志文件清空,如需保留日志,请自行修改。每次加载iptables规则时会清楚上次所有规则,如果有使用其它规则也要自行处理。

#!/bin/python
#-*- coding:utf-8 -*-
# Filename:    drop_ip_iptables.py
# Revision:    1.0
# Date:        2013-2-21
# Author:      simonzhang
# web:         www.simonzhang.net
# Email:       simon-zzm@163.com
### END INIT INFO
import os
import time
from string import strip


#### 参数和脚本中使用到的系统命令
nginx_log = "/usr/local/nginx/logs/nginx.access.log"
# 统计nginx日志中IP访问数量
check_comm = "/bin/cat %s |awk ' ''{print $1}'|sort |uniq -c|sort -n -k1 -r" % nginx_log
# 放在crontab中10分钟跑一次,访问超出n次的全部封掉
overproof = 3000
# 被封地址记录文件
# 文件中记录封IP时间和IP地址。时间单位为秒
lock_ip_list = "/usr/local/nginx/logs/lock_ip_list.txt"
# 被封地址解开时间。时间单位为秒
unlock_time = 3600*24*2 


def manage_lock_ip():
    # 获取当前时间
    get_now_time = int(time.time())
    # 管理日志字典
    man_ip = {}
    # 处理日志中的IP
    try:
        log_file = open('%s' % lock_ip_list, 'rb').readlines()
        for get_ip_info in log_file:
            _get_ip_info = strip(get_ip_info).split(' ')
            man_ip['%s' % _get_ip_info[1]] = int(_get_ip_info[0])
    except:
        exit(0)
    # 清空iptable列表,和ip记录日志
    os.popen('/sbin/iptables -F')
    clean_file = open('%s' % lock_ip_list, 'rb+')
    clean_file.truncate()
    # 开始处理IP,被封没有超时的IP写入iptables和日志中
    log_file = open('%s' % lock_ip_list, 'ab')
    for loop_ip in man_ip.keys():
        if (get_now_time - man_ip[loop_ip]) < unlock_time:
            os.popen('/sbin/iptables -I INPUT -s %s -j DROP' % loop_ip)
            log_file.write('%s %s\n' % (man_ip[loop_ip], loop_ip))
    log_file.close()


def main():
    # 已封IP地址字典
    drop_ip_list = {}
    # 加载已封IP日志
    try:
        log_file = open('%s' % lock_ip_list, 'rb').readlines()
        for get_drop_ip_info in log_file:
            _get_drop_ip_info = strip(get_drop_ip_info).split(' ')
            drop_ip_list['%s' % _get_drop_ip_info[1]] = int(_get_drop_ip_info[0])
    except:
        os.mknod('%s' % lock_ip_list)
    # 获取nginx日志中的访问超高的ip并写入日志
    access_high_ip = os.popen('%s' % check_comm).readlines()
    for get_ip_count in access_high_ip:
        try :
            _get_ip_count = strip(get_ip_count).split(' ')
            _get_ip = _get_ip_count[1]
            _get_count = _get_ip_count[0]
        except:
            pass
        if (int(_get_count) > int(overproof)) and (_get_ip not in drop_ip_list.keys()):
            now_time = int(time.time())
            log_file = open('%s' % lock_ip_list, 'ab+')
            log_file.write('%s %s\n' % (now_time, _get_ip))
            log_file.close()
    # 统计完毕清空nginx日志
    log_file = open('%s' % nginx_log, 'wb')
    log_file.truncate()
    # 处理要封的IP和要解开的IP
    manage_lock_ip()


if __name__ == '__main__':
    main()

再补充两条日志分析命令
# 单位时间内统计单个IP只访问首页的数量:
#check_comm = “/bin/cat %s|grep ‘GET / HTTP/1.1’|awk ‘ ”{print $1}’|sort |uniq -c|sort -n -k1 -r” % nginx_log
# 单位时间内统计单个IP访问相同页面的数量
#check_comm = “/bin/cat %s|awk -F'”‘ ‘{print $1 $2}’|awk ‘ ”{print $1″ “$6” “$7” “$8}’|sort -k2,4 -r|uniq -c|sort -n -k1 -r” % nginx_log

源码下载
drop_ip_tables

11月 09

用nginx的cache 对本地静态文件做缓存

需要对静态文件做缓存,但是静态文件也是在本地,由同一个nginx来解析。
使用if不能嵌套,所以只能使用本地的IP跳转一下,我的cache使用的nginx命名cache_one配置如下。如果本地跳转有问题可以再hosts表中修改一下指向。

   #######################pic
   upstream  local_img {
            server localhost:81;
       }
    server{
        listen       81;
        server_name 127.0.0.1;
        location / {
                root /image/;
                client_max_body_size   10m;
                access_log off;
                autoindex off;
                }
    }
   server {
        listen       80;
        server_name img.test.com;
        proxy_cache cache_one;
        location / {
                proxy_redirect off;
                proxy_cache_valid 200 304 12h;
                proxy_cache_valid 301 302 1m;
                proxy_cache_key $host$uri$is_args$args;
                add_header X-Cache $upstream_cache_status;
                proxy_set_header Host $host;
                proxy_set_header X-Forwarded-For $remote_addr;
                proxy_pass http://local_img;
                access_log off;
                }
    }
6月 20

nginx 自动封 ip 过高连接

  用命令查看web连接过高的IP地址,但是需要人工智能去封,太麻烦了,直接写个脚本自动解决。web服务器是用nginx,python为2.6
  首先在nignx的config中建立空文件deny.ip, 然后在nginx.conf 的http标签中添加“include deny.ip;”。在nginx下sbin的目录中放入自动脚本。脚本可以查到连接最大的IP,并插入屏蔽列表中,验证正确性后导入配置。全部完成或者出错后发送邮件。被封ip再次访问会报403错误,如果不希望报错可以跳转到其它页面。源码如下:

check_deny_up.py

#!/bin/python
#-*- coding:utf-8 -*-
# Filename:    main.py
# Revision:    1.0
# Date:        2012-06-20
# Author:      simonzhang
# web:         www.simonzhang.net
# Email:       simon-zzm@163.com
### END INIT INFO
import os
from string import strip
from email.mime.text import MIMEText
import smtplib

####
check_comm = "/bin/netstat -antp|grep :80|awk ' ''{print $5}'|awk -F: '{print $1}'|sort -r|uniq -c|sort -n -k1 -r"
max_ip = 100
mail_host = ‘’;
mail_user = ‘’;
mail_pwd = ‘’;
mail_to = ‘’;
mail_cc = ‘’;


def reboot_nginx_sendmail(ip_list):
    #### reboot nginx
    _get_check_confile = os.popen('./nginx -t').readlines()
    if str(_get_check_confile.find('ok')) != '-1':
        os.system('./nginx -s reload')
        _mail_content = ip_list
    else:
        _mail_content = 'Error'
    #### send mail
    msg = MIMEText(_mail_content)
    msg['From'] = mail_user
    msg['Subject'] = ' force ip.'
    msg['To'] = mail_to
    try:
        s = smtplib.SMTP()
        s.connect(mail_host)
        s.login(mail_user, mail_pwd)
        s.sendmail(mail_user, [mail_to, mail_cc], msg.as_string())
        s.close()
    except Exception, e:
        print e


#### force out IP
def force_out(_deny_ip):
    _write_status = 0
    _read_force_file = open('../conf/deny.ip', 'rb').read()
    if  str(_read_force_file.find(_deny_ip)) == '-1':
        try:
            _get_force_file = open('../conf/deny.ip', 'ab')
            _get_force_file.write('deny %s ;\n' % _deny_ip)
            _get_force_file.close()
            _write_status = 1
            return _write_status
        except:
            return _write_status
            reboot_nginx_sendmail("Error !")
    return _write_status


def main():
    get_high_ip = os.popen('%s' % check_comm).readlines()
    _count_force_ip = 0
    _force_ip_list = ''
    for i in xrange(3):
        try:
            _get_count = strip(get_high_ip[i]).split(' ')[0]
            _get_ip = strip(strip(get_high_ip[i]).split(' ')[1])
        except:
            _get_count = 0
            _get_ip = ''
        # Maximum connection IP is Beyond the limit value
        if (int(_get_count) > max_ip) and (len(_get_ip) > 0):
            force_ip = _get_ip
            _get_status = force_out(force_ip)
            # check maximum is added in the deny.ip file
            if str(_get_status) == '1':
                _count_force_ip += 1
                _force_ip_list += ' %s ' % force_ip
#    if _count_force_ip > 0:
#        reboot_nginx_sendmail(_force_ip_list)


if __name__ == '__main__':
    main()

启动i脚本
check_deny_up.sh

#! /bin/bash
#
# make simon-zzm@163.com
#
#
### END INIT INFO

# Source function library.
. /etc/profile
cd /Data/apps/nginx/sbin/

# See how we were called.
case "$1" in
  start)
      /usr/local/bin/python check_ip_deny.py
      ;;
  *)
        echo $"Usage: $0 {start}"
        exit 1
esac

exit

将启动脚本放在crontab中运行。