2月 24

esp8266做AP启动WEB服务器控制led

配置ap。

import network
ap_if = network.WLAN(network.AP_IF)
ap_if.config(essid="simonzhang.net", authmode=network.AUTH_WPA_WPA2_PSK, password="simon")

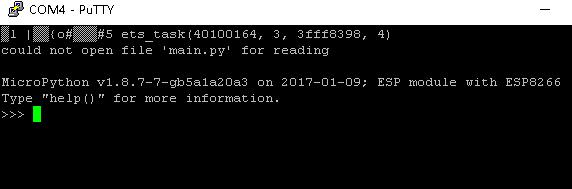
代码部分,保存为main.py上传到板子上,重启。

import machine
pins = [machine.Pin(i, machine.Pin.IN) for i in (0, 4, 5)]

html = """
HTTP/1.0 200 OK


    www.simonzhang.net test
    

    %s
    

GPIO0  

GPIO4  

GPIO5  

""" def indexHandle(rtype, argv): if rtype == 'GET': try: num = argv.split('=')[1] except: num = 9999 if num == 9999: pass else: num1 = num[:-1] num2 = num[-1] if num1 == "OFF": machine.Pin(int(num2), machine.Pin.OUT, value=0) elif num1 == "ON": machine.Pin(int(num2), machine.Pin.OUT, value=1) rows = ['%s%d' % (str(p), p.value()) for p in pins] return html%'\n'.join(rows) def pinHandle(rtype, argv): print(rtype) print(argv) def route(getData): rtype = getData[0].split()[0] path = getData[0].split()[1] if path.find('?') > -1: urlPath = path.split('?')[0] argv = path.split('?')[1] else: urlPath = path argv = '' rou = {'/' : indexHandle(rtype, argv)} try: htmlContext = rou[urlPath] except: htmlContext = html%'error' return htmlContext import socket addr = socket.getaddrinfo('0.0.0.0', 8888)[0][-1] s = socket.socket() s.bind(addr) s.listen(1) while True: cl, addr = s.accept() cl_file = cl.makefile('rwb', 0) tmp = '' line = '' while True: line = cl_file.readline() tmp = '%s%s' % (tmp, line.decode('utf-8')) if not line or line == b'\r\n': break cl.send(route(tmp.split('\r\n'))) cl.close()

esp8266we控制led源码

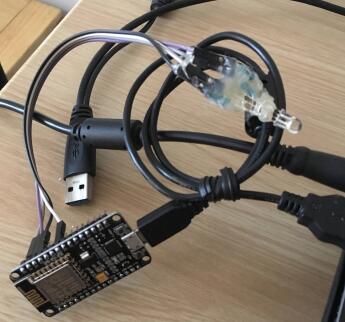
连接ap,用浏览器登录192.168.4.1:8888端口
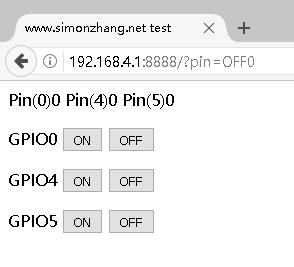

控制led成功。

2月 18

安装ta-lib问题记录

直接使用pip install Ta-LIB,报错如下:
talib/common.c:242:28: fatal error: ta-lib/ta_defs.h: No such file or directory
解决方案先下载0.4版进行编译
ta-lib-0.4.0-src.tar.gz
然后解压
./configure & make & make install

安装0.4版本完成在用pip安装最新版本就成拱了。但是运行程序有又报错:
ImportError: libta_lib.so.0: cannot open shared object file: No such file or directory
在整个系统中搜索,发现在系统中有这个库。
find / -name libta_lib.so.0
/usr/local/lib/libta_lib.so.0
所以加载一下应该就可以了,在/etc/profile增加一行
export LD_LIBRARY_PATH=$LD_LIBRARY_PATH:/usr/local/lib
然后执行
source /etc/proflie
生效后再次运行py脚本既可成功。

2月 16

stun服务器解决穿私网问题

未解决VOIP电话传私网问题(NAT),搭建stun服务器。简要记录如下

https://sourceforge.net/projects/boost/files/boost/1.63.0/boost_1_63_0.tar.gz
./bootstrap.sh
./bjam install

http://www.stunprotocol.org/
http://www.stunprotocol.org/stunserver-1.2.12.tgz
tar zxvf stunserver-1.2.12.tgz
cd stunserver-1.2.12
make
编译完成直接启动
./stunserver &

查看端口
lsof -i:3478

端口已经监听,配置到VOIP设备测试,一切正常。

2月 11

nodemcu esp8266 micropython 学习

购买esp8266学习python开发单片机。
esp6288板子

下载windows用的刷固件工具
https://github.com/nodemcu/nodemcu-flasher
下载编译文件的下载位置
http://micropython.org/download#esp8266

启动刷固件工具选择固件
esp8266选择固件
开始刷机
esp8266刷固件

使用串口调试工具或者putty连上后就可以写代码了。我的串口是com4。
esp6288串口配置1
esp6288串口配置2
esp6288串口连接

刷新完毕,直接用3三色led实验GPIO。
esp6288测试led
代码如下,板子上表示的序号有误,测试了多次才对上。

from machine import Pin
import time
ll = [0, 4, 5]
for oneline in ll:
    Pin(oneline, Pin.OUT, value=1)
    time.sleep(3)
    Pin(oneline, Pin.OUT, value=0)
    time.sleep(1)

代码测试正常。开始测试无线。

使用help()可以看到连接WiFi部分和ap部分
import network
sta_if = network.WLAN(network.STA_IF); sta_if.active(True)
sta_if.scan() # Scan for available access points
sta_if.connect(““, ““) # Connect to an AP
sta_if.isconnected() # Check for successful connection
# Change name/password of ESP8266’s AP:
ap_if = network.WLAN(network.AP_IF)
ap_if.config(essid=”“, authmode=network.AUTH_WPA_WPA2_PSK, password=”“)

开启启动并上传文件。
将之前代码保存文件命名为main.py。使用http://www.w2bc.com/article/191374开发的小工据上传。
上传完毕,实验结果正常。查看系统main.py在系统中。
esp8266启动文件

收集文档
推荐站点
http://www.zhimadiy.top/

python的lib库
https://github.com/micropython/micropython-lib

固件
https://github.com/micropython/micropython

控制机械臂
http://forum.micropython.org/viewtopic.php?t=2441&p=14251

文档
http://docs.micropython.org/en/latest/esp8266/

开发图形 IDE

ESPlorer