本来是想找个函数,但是网上大部分都是for和while太麻烦,如下即可。
从0加到5
sum([n for n in range(6)])
11月
30
本来是想找个函数,但是网上大部分都是for和while太麻烦,如下即可。
从0加到5
sum([n for n in range(6)])
#!/bin/env python3
#-*- coding:utf-8 -*-
import tornado.ioloop
import tornado.locale
import tornado.web

import hashlib

class checkHandler(tornado.web.RequestHandler):
    def get(self):
        signature = self.get_argument('signature')
        timestamp = self.get_argument('timestamp')
        nonce = self.get_argument('nonce')
        echostr = self.get_argument('echostr')
        token = 'xxxxxxx'
        list1 = [token, timestamp, nonce]
        list1.sort()
        strList =  ''.join(list1)
        sha1 = hashlib.sha1()
        sha1.update(strList.encode('utf-8'))
        if sha1.hexdigest() == signature:
            self.write(echostr)
        else:
            self.write('')
http://nuitka.net
http://www.pyinstaller.org
推荐使用pyinstaller
安装加密模块
pip install PyCrypto
安装加壳工具
yum install upx
找到upx位置
#whereis upx
#upx: /usr/bin/upx /usr/share/man/man1/upx.1.gz
# pyinstaller -F –key !@#$%^&*gew –upx-dir /usr/bin/upx –clean test.py
编译测试,keys为pyc加密使用。
>>> import datetime
>>> datetime.datetime.now().isocalendar()
(2018, 14, 7)
#返回结果是(年号,第几周,第几天)
>>> (int(datetime.datetime.now().strftime(“%m”))-1)//3+1
2
#返回结果是当日的季度
>>> (int(datetime.date(2014,8,15).strftime(“%m”))-1)//3+1
3
#返回制定日期的季度
raspberry pi上安装mqtt服务器。
apt-get update
apt-get install mosquitto
apt-get install mosquitto mosquitto-clients python-mosquitto
apt-get install python-mosquitto
启动mqtt服务
mosquitto
检查mqtt服务是否启动。默认1883端口。
netstat -antp
结果
tcp 0 0 0.0.0.0:1883 0.0.0.0:* LISTEN 383/mosquitto
查看服务器详细信息命令
/etc/init.d/mosquitto status
esp8266源码
# -*- coding:utf-8 -*-
import network
from mqtt import MQTTClient
import machine
import time

# 连接WIFi
sta_if = network.WLAN(network.STA_IF); sta_if.active(True)
#sta_if.scan()
sta_if.connect("SID", "密码")

while not sta_if.isconnected():
    machine.idle()

# 根据订阅内容开关灯
def sub_cb(topic, msg):
   if int(msg) == 0:
       machine.Pin(int(12), machine.Pin.OUT, value=0)
   elif int(msg) == 1:
       machine.Pin(int(12), machine.Pin.OUT, value=1)

# 连接mqtt服务器
client = MQTTClient(client_id="1", server="192.168.1.212", port=1883)
client.set_callback(sub_cb)
client.connect()
# 循环获取内容
while True:
    client.subscribe(topic="simonzhang/net")
    time.sleep(0.5)
esp8266的mqtt lib地址如下。将mqtt.py和主文件命名为main.py上传到esp8266。
https://github.com/simon-zzm/ESP8266-lib/blob/master/mqtt.py
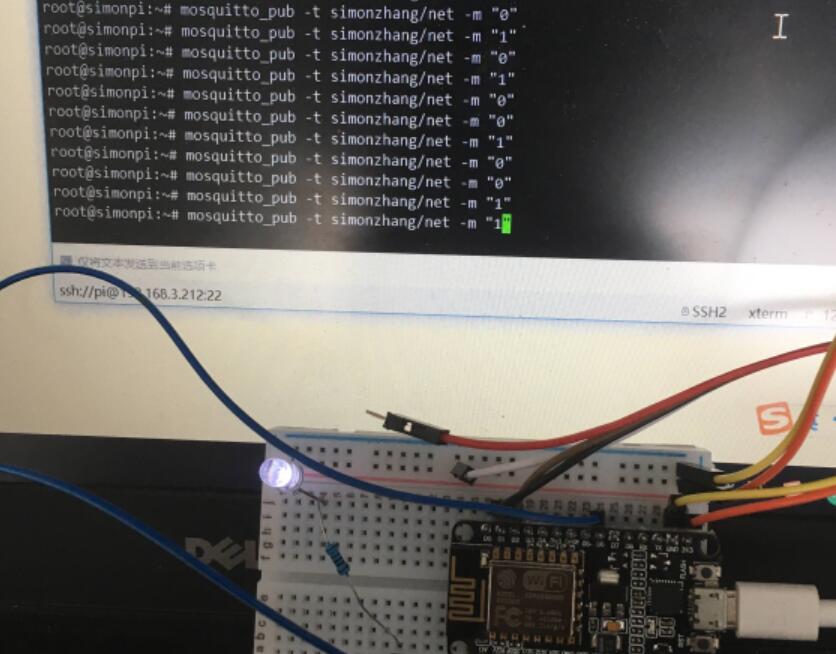
重启esp8266,在raspberry pi上推送消息控制灯开关成功。
开灯
mosquitto_pub -t simonzhang/net -m “1”
关灯
mosquitto_pub -t simonzhang/net -m “0”
其它记录
命令行
mosquitto_sub -t simonzhang/net
-t 指定订阅主体(topic),主体不用提前设定,直接发布就行。
mosquitto_pub -t simonzhang/net -m “Hello, simonzhang!”
-m 为发送内容
订阅名称可以用 + 代替,例如:
simon/+/zhang/+
这样就可以推送,“simon/hello/zhang/led”的主体。
#号应用于主体的结尾,例如:
simon/hello/zhang/led#
需要研究的还有通讯加密,程序加密和耗能部分。